Even in today’s digital world, there are times when sending a physical letter or document is necessary—whether it’s for a job application, formal invitation, thank-you card, or business correspondence. Addressing an envelope correctly ensures your letter arrives at the intended destination without delay. In this step-by-step visual guide, you’ll learn the correct way to format and send an envelope the right way.
Step 1: Choose the Correct Envelope Size and Style
Before writing anything, select the appropriate envelope for your letter.
-
Standard business letters usually go in #10 envelopes (4 1/8″ x 9 1/2″).
-
Greeting cards or invitations typically use A7 or square envelopes.
-
Documents that shouldn’t be folded are better sent in 9″x12″ manila envelopes.
Visual Tip: Show different types of envelopes lined up with labels (e.g., business, card, document).
Make sure your envelope is clean, unwrinkled, and properly sealed when ready to send.
Step 2: Orient the Envelope Properly
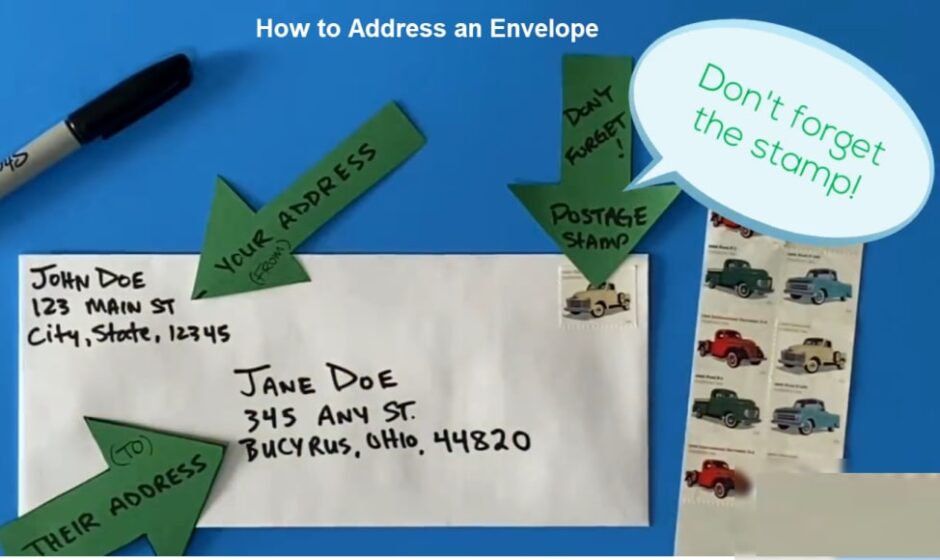
Lay the envelope on a flat surface with the flap side down and the front facing up. This is the side where you’ll write both the delivery and return addresses.
Visual Tip: Display an envelope flat with labeled areas: center, top-left, and top-right.
Always ensure that the longer edge runs horizontally.
Step 3: Write the Recipient’s Address (Delivery Address)
This is the main address to which you are sending your letter. It should be centered on the envelope and written clearly in the following format:
-
Full name of the recipient
-
Street address or P.O. Box
-
City, State, ZIP Code
-
Country (only if sending internationally)
Visual Tip: Show this format typed and centered on an envelope image.
Use clear block letters and avoid cursive for postal clarity.
Step 4: Add the Return Address
This is your own address and goes in the top-left corner of the envelope. If your mail cannot be delivered, it will be returned to this address.
Return Address Format:
-
Your full name
-
Street address or P.O. Box
-
City, State, ZIP Code
-
Country (for international mail)
Visual Tip: Highlight the return address section in the upper-left corner.
Using a return address is especially important for formal or time-sensitive mail.
Step 5: Place the Postage Stamp
Affix a stamp in the top-right corner of the envelope. The type and number of stamps depend on:
-
Destination (domestic or international)
-
Weight and size of the envelope
-
Speed of delivery (e.g., First-Class, Priority Mail)
For most U.S. letters under 1 ounce, one Forever stamp will suffice.
Visual Tip: Close-up image of a Forever stamp on an envelope.
Don’t place stamps too close to the edges or overlap multiple stamps.
Step 6: Double-Check for Accuracy
Take a moment to review the information on your envelope:
-
Are all addresses spelled correctly?
-
Is the ZIP Code accurate?
-
Is your handwriting legible?
-
Is the stamp affixed in the correct spot?
Visual Tip: Checklist next to a completed envelope.
Small errors can delay your letter or cause it to be undelivered.
Step 7: Mail It
Once everything is checked, your envelope is ready to go. You can:
-
Drop it into a local mailbox
-
Hand it to a postal carrier
-
Bring it to a post office
If your envelope is unusually shaped, heavy, or important, consider sending it certified or with tracking for added security.
Visual Tip: Person placing envelope into a blue mailbox or handing it to a clerk.
Bonus Tips for a Professional Look:
-
Use a ruler or address guide to keep lines straight.
-
Avoid using colored inks that may not scan easily (e.g., red or light blue).
-
Print labels for large volumes or formal invitations.
-
Don’t tape over stamps—they must be postmarked.
Conclusion
Addressing an envelope properly isn’t just about following postal rules—it’s a sign of attention to detail and professionalism. Whether you’re sending personal or formal correspondence, using these seven simple steps will help your envelope arrive safely, quickly, and respectfully.
Read more: https://fastpanda.in/