You put the satellite in, turn it on, and wait. All you see is a blinking or static LED, and your router dashboard doesn’t show it. It’s not a hardware issue; it’s a problem with the configuration.
This article will show you exactly how to connect Orbi satellite. We’ll go over how to optimize signals, check firmware, sync manually, and finally do a full Orbi login to make sure the mesh network is stable.
1. Check the power and the placement
First, put the Orbi satellite into a wall socket close to your network. Give it at least five minutes to start completely.
- Solid white means ready.
- Blinking white means the computer is starting up.
- Amber or magenta indicates the device is trying to connect or failing to receive the signals.
Trying moving the satellite to various locations until it shows a solid white or blue color. The most typical way of fixing Orbi Satellite Not Connecting Issues.
2. Check the wireless and router firmware settings
Use the Orbi app or the router’s IP address to log in. Go to the Firmware Update section and check to see whether you’re using the recent version. If the router and satellite are even one version outdated, the device won’t be able to sync. Firmware update is not a choice; it is the requirement of your device.
3. Follow the Manual Sync Procedure
Automatic pairing is easy, but it doesn’t always work.
First, press and hold the Sync button on the router for two seconds. The LED will blink.
Now, press and hold the satellite’s Sync button for two minutes, or until the LED starts to glow white. This connection between the devices helps in fixing the timing problems and generally gets rid of connection blockages in less than a minute.
4. Fix wireless interference
If the LED stays amber or magenta, the signal quality is bad. Microwaves, big furniture, thick walls, and shiny surfaces all get in the way of packet flow. Put the satellite in the same open room as the router for a short time.
Once the blue LED shows that the two devices are connected, move them to where they will be used and make sure the connection remains strong before leaving.
5. Look at the DHCP and IP address
Log in to the router’s admin panel and look at the list of connected devices. If the satellite doesn’t show up or gives an error, give it a static DHCP lease. This eliminates IP conflicts that mess up pairing without anybody knowing, even when the LED seems OK. Reboot the router and satellite after saving the settings.
6. Do a factory reset when necessary
If pairing still doesn’t work, reset the satellite to get rid of old configuration data:
- Press and hold the Reset button for 10 seconds, or until the lights flash.
- Give it a full minute to restart.
- Put it near to the router and do the manual sync again.
- This gets rid of any leftover encryption keys or firmware that don’t match.
You can also use an ethernet Backhaul method but its optional
Connecting the satellite via Ethernet gives you a clean backhaul during setup:
- Connect one end to the router in the LAN port and the other end to the satellite.
- Turn off both devices and wait for them to automatically connect.
You may take out the cable and use WiFi after the satellite shows up on the dashboard and the status LED turns blue.
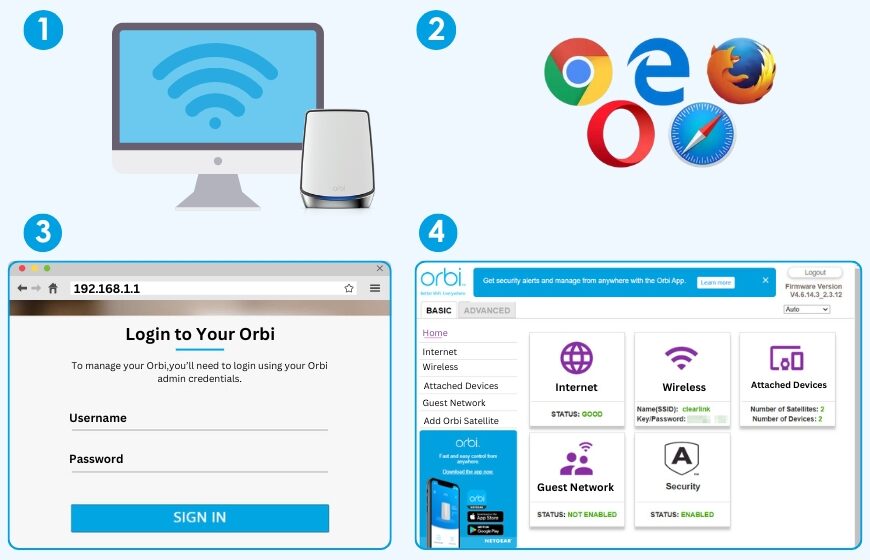
8. Finish setting up by logging in to Orbi
After the pairing is successful, log into the router interface and check:
- The status of the satellite is shown under “Satellite Status.”
- Quality of connection: blue means a strong link, green means a moderate link, and amber or magenta means a weak link.
- The firmware is updated.
- If you want to make it simpler to find, give the satellite a new network name.
- Save your work and restart the computer to make sure everything works normally again.
This finishes your Orbi login verification and makes sure that your mesh network is both visible and working.
In conclusion
We hope the confusion related to how to connect Orbi satellite has got an answer, such as: you need to position it carefully, update the firmware, and sync it manually. Weak signals and old firmware are the two main problems. A wired ethernet backhaul is a good backup for configurations that are hard to work with. By following this guide—checking the lights, making sure everything is synced, and logging into Orbi—you can set up a fast, dependable mesh network.
FAQs
1. Why does the LED on my Orbi satellite keep flickering amber or magenta?
Amber normally denotes that the wireless network is poor, whereas magenta suggests that it is attempting to connect. To force pairing, move the satellite closer to the router or attempt manual sync.
2. How important is it that the firmware version of the router and the satellite doesn’t match?
It is important that the router and satellite firmware be quite similar. Automatic pairing frequently fails without a sound when versions are out of sync. Before installing satellites, make sure your router’s firmware is up to date.
3. Is it possible to set up a satellite using Wi-Fi instead of Ethernet?
Yes, you can. Wi-Fi setup works well as long as the signal is strong and the location is near. Ethernet backhaul helps keep things stable during the initial setup, but it isn’t necessary beyond that.